Monday, December 10, 2007

How to blog with MS Word 2007

In this post I'd like to show you how to use MS Word 2007 as a Client for your Blog-Posts. First of all you need three things:

  1. A functional blog. I use Blogger
  2. Webspace for pictures. Blogger interacts very smoothly with Picasa
  3. And of course MS Word 2007 as a Client.

After you have set up all of those three prerequisites the easiest way to start is to open your MS Word 2007 and push the little button on the upper left corner. There you will find an entry 'Veröffentlichen' and on the corresponding menu you will find the 'Blog' entry which you have to execute as the next step. Then a new MS Word 2007 'instance' will pop up and here you can finally set up your personal Blog settings. Under the 'Blog' section you will find the corresponding button to open up the settings which you have to configure. The following screenshots show how you can easily click you through the settings and after configuring all you'll be able to use Word as a client.

Push the button on the upper left corner.
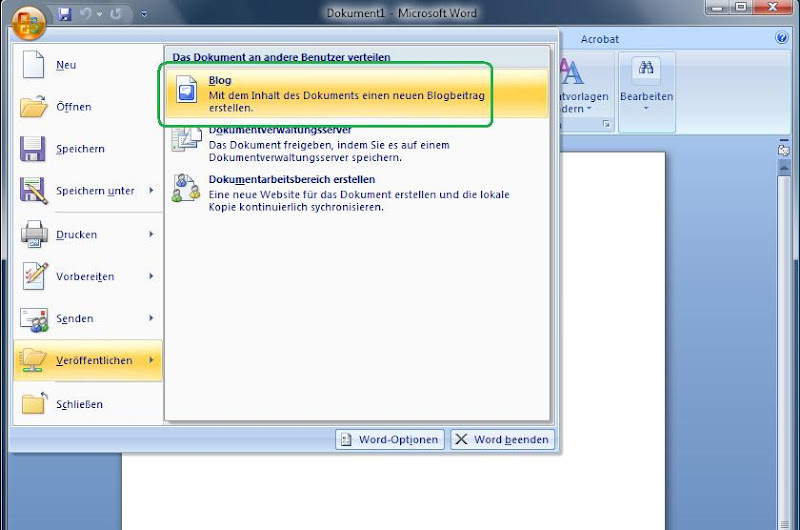

This button is necessary for your blog settings.


If you haven't already configured your blog do so by pushing the 'New' button.


Chose your Blog provider. ( I've chose Blogger)


Enter your blog's login-credentials.


If you have a supported picture provider chose it and click next.


If you have already more than one blog select the one you would like to configure in Word.


Click ok. This is just a confirmation dialog which says that you have successfully configured you blog.


Now you should be able to see your configured blog.


Now blog with MS Word 2007 as a client.


PICASA and how to use it's pictures in MS Word 2007 within a blog-post.

A very interesting thing I'd like to show you in the next step is how you will be able to use pictures from Picasa within Word after you have already uploaded those pictures which you would like to use in your blog-post. So as I said you have to upload all pictures and if you have done so to your online web album of your Picasa web space then do the following:

  1. Open the picture you would like to use.
  2. Click on the 'Link to this Photo' link.
  3. Select the size of the picture which you'd like to have your picture shown on you blog.

The copied link will look something like this:

<a href="http://picasaweb.google.com/Sageniuz/HowToBlogWithMSWord2007/photo?authkey=PQ1-4utD-0M#5142340762644508850"><img src="http://lh6.google.com/Sageniuz/R11Dradv8LI/AAAAAAAABHc/HCGQFYLCLA0/s144/01.jpg" /></a>

You only will need the: http://lh6.google.com/Sageniuz/R11Dradv8LI/AAAAAAAABHc/HCGQFYLCLA0/s144/01.jpg part of the copied link or better you only copy this part of the link. The next step is to select the 'Einfügen'-tab in MS Word 2007 and click on the 'Grafik' button. A new dialog will pop up and now you have to paste the copied part of you picasa-link into the 'Einfügen' input field. After you have done this you have to select the 'Einfügen u. Verknüpfen' section in the selection bar to left of the 'Abbrechen' button. After a few seconds the picture of picasa will be referenced to you MS Word 2007 client.

Select picture.


Go to 'Einfügen' tab.


Push 'Grafik' button to paste your picture.


Paste the link to your picture.


Select 'Einfügen u. Verknüpfen'.


Now the picture will be in your blog-post within Word.


So, I hope you liked this little tutorial and it will help you to improve your 'blog-speed', too. Although there is a time delay while inserting pictures in Word from Picasa I like all the Word features better than the integrated editor within Blogger. Moreover you can save posts locally on your pc and if you don't have an internet-connection you will be able to write blog posts and upload them a little later.

Cheers

Saturday, December 08, 2007

NetBeans 6.0 | A little JPA Example

In this post I'd like to show you how to use JPA in NetBeans within a Java SE application. First of all you have to create a database and call it something like TestDB. I called my database 'Medienverwaltung' because I did a small JPA-tutorial from the new Javamagazin which had exactly the same database.


Create a very simple table without any references on other tables and call it 'ACTOR'. That's all you need for a first little JPA test. Now, create a JavaApplication in NetBeans. I called my application 'JPAGenTest'.


The next step is to generate an Actor-Entity-Class which will map the data into the corresponding 'ACTOR'-table in your database. A lot of errors will show up. That's because the necessary libraries are still missing.


You can import them by configure your libriaries within the IDE or you create the persistent-unit and the libs will be imported automatically. You have to create this persistent unit anyway so I've decided to create it to import the missing libs.


Now all errors are gone and you will be able to create more JPA functionality. The next step is to implement a Manager-Class which handles the JPA persistence-context. That means this class is responsible to provide CRUD functionality for your actor-instances and to communicate with your database.


I've named this kind of class 'ActorManager' and implemented the following typically methods to interact with my database:
  • createActor
  • findById
  • findByFirstname (NamedQuery)
  • findByLastname (NamedQuery)
  • updateActor
  • removeActor
  • getAll
  • removeAll

NamedQuery is a JPA-Feature which was automatically created by NetBeans when you've created your Enitity-Class. It's a simple JPQL statement which usually will be used more often in your application.

Here is the code from the ActorManager:


package com.blogspot.sageniuz;

import java.util.Iterator;
import java.util.List;
import javax.persistence.EntityManager;
import javax.persistence.EntityManagerFactory;
import javax.persistence.Query;

/**
* Actor-Manager
* @author Claus Polanka
*/
public class ActorManager {

private EntityManager em;

public ActorManager(EntityManagerFactory emf) {
em = emf.createEntityManager();
}

public void createActor(ActorGenEntity actor) {
em.getTransaction().begin();
em.persist(actor);
em.getTransaction().commit();
}

public ActorGenEntity findById(Integer id) {
return em.find(ActorGenEntity.class, id);
}

public List findByFirstname(String firstname) {
Query query = em.createNamedQuery("ActorGenEntity.findByFirstname");
query.setParameter(firstname, em);
List listOfActors = query.getResultList();
return listOfActors;
}

public List findByLastname(String lastname) {
Query query = em.createNamedQuery("ActorGenEntity.findByLastname");
query.setParameter(lastname, em);
List listOfActors = query.getResultList();
return listOfActors;
}

public void updateActor(ActorGenEntity actor) {
em.getTransaction().begin();
em.merge(actor);
em.getTransaction().commit();
}

public void removeActor(ActorGenEntity actor) {
em.getTransaction().begin();
em.remove(actor);
em.getTransaction().commit();
}

public List getAll() {
Query query = em.createQuery("select a from ActorGenEntity a");
List list = query.getResultList();
return list;
}

public void removeAll() {
em.getTransaction().begin();
Query query = em.createQuery("select a from ActorGenEntity a");
List list = query.getResultList();
Iterator it = list.iterator();
while (it.hasNext()) {
ActorGenEntity actor = it.next();
em.remove(actor);
}
em.getTransaction().commit();
}

public void close() {
em.close();
}
}


Testing the application is the next thing to do, so let's create a JUnit test-clase. Before you start implementing it check if you have already imported you database-driver or you will get an exception when executing your JUnit-test.


Here is the code for my test-class:


package com.blogspot.sageniuz;

import java.util.List;
import javax.persistence.EntityManager;
import javax.persistence.EntityManagerFactory;
import javax.persistence.Persistence;
import junit.framework.TestCase;

/**
* CRUD Test for Actor-Class.
* @author Claus Polanka
*/
public class TestActorManager extends TestCase {

private ActorManager am;
private EntityManager em;
private EntityManagerFactory emf;

private static final ActorGenEntity TESTACTOR1 = new ActorGenEntity(1, "Claus", "Polanka");
private static final ActorGenEntity TESTACTOR2 = new ActorGenEntity(2, "Barbara", "Ebinger");
private static final ActorGenEntity TESTACTOR3 = new ActorGenEntity(3, "Irene", "Polanka");

public TestActorManager(String testName) {
super(testName);
}

@Override
protected void setUp() throws Exception {
emf = Persistence.createEntityManagerFactory("pu-medienverwaltung");
em = emf.createEntityManager();
am = new ActorManager(emf);
}

@Override
protected void tearDown() throws Exception {
am.close();
em.close();
emf.close();
}

public void testCRUD() {
am.createActor(TESTACTOR1);
ActorGenEntity actor = am.findById(1);
assertEquals(actor.getFirstname(), "Claus");

actor.setFirstname("Barbara");
am.updateActor(actor);

actor = am.findById(1);
assertEquals(actor.getFirstname(), "Barbara");

am.createActor(TESTACTOR2);
am.createActor(TESTACTOR3);

List list = am.getAll();
assertEquals(list.size(), 3);

am.removeAll();
list = am.getAll();
assertEquals(list.size(), 0);
}
}

The following picture shows my project-tree and how your project-structure should also look like.


After running your test you should see something like the following.


In the next days I will test more of the JPA features like support for derived Entities and stuff like that.

Cheers