Showing posts with label Java. Show all posts

Thursday, January 24, 2008

Sun Academic Initiative | TU-Vienna

In my last two posts, I talked about how you can find the right websites to get a Sun Certificate. On the Prometric Website if you select Sun Mircrosystem you will have two choices: the SUN Academic Initiative (212) and the Sun Microsystems (310, 311) and there will be a big price difference between those two options. You will find the corresponding price list for the regular Sun Microsystem Certifcates in my last post.

As I saw the big price difference (the SAI is only 129 Bucks) I tried to figure out how I'm able to do that kind of exam instead of the regular one and what the preconditions are. So I googled SAI and I found out that my university (TU-Vienna) offers possibilities to get the right information about the SAI for students.

Here you will find a guidance on how to register for SAI over the TU-Vienna. On this website you will find a link to register to the SAI-Portal. If you scroll down you will find all necessary resources for the SAI. So what the TU provides is the possibility to use Sun's online training for free. You just have to pay 2,70 Bucks for the ZID's administrative effort but that's affordable.

So, I think I only have to pay 129 Bucks for the Exam and not the 210 which I've blogged about. Well, that's pretty cool.

Links:

Cheers

Wednesday, January 23, 2008

Java Certificates Prices

In my last post I tried to find out how much Java Certificates do cost in Vienna but I couldn't find the right information on the WIFI-Website. So I called the WIFI's IT-Center on last Monday and they gave me more information about these Certificates. They told me to go to the Prometric-Website and there I was able to find the prices for all Certificates. You just have to select your country and then you have to choose the Client and the corresponding Program. I chose Sun Microsystems / Sun Microsystems and then you will find all possible exams and prices. The following list shows all exams which I'm currently interested in:

Sun Microsystem:

  • 310-019 Sun Certified Associate Java Platform SE Exam Version 1.0 210 Euro
  • 310-027 Sun Certified Developer For J2SE 210 Euro
  • 310-035 Sun Certified Programmer For The Java 2 Platform 1.4 210 Euro
  • 310-051 Sun Certified Enterprise Architect For J2EE Technology 210 Euro
  • 310-055 Sun Certified Programmer For The Java 2 Platform SE 5.0 210 Euro
  • 310-061 Sun Certified Enterprise Architect For J2EE Part 3 210 Euro
  • 310-065 Sun Certified Programmer For The Java 2 Platform SE 6.0 210 Euro
  • 310-081 Sun Certified Web Component Developer For J2EE 1.4 210 Euro
  • 310-091 Sun Certified Business Component Developer Java EE Platform 5 210 Euro
  • 310-220 Sun Certified Developer For Java Web Services 210 Euro

Today I also found out that some of my colleagues at work would also like to get a Java Certificate (310-055) We are now making preparations together at work for the corresponding exam. A Wiki also was created to organize and save all information online so that everyone who joins the learning-group will be always up to date on the latest information.

Links/Telnr:

I'm very excited about learning for this exam and I'm dying to get more exams in the future. So, the next step is to find out the date when the next exam will take place. As soon as I know all possible dates I will let you know in another post.

Cheers

Saturday, January 19, 2008

Java Certificates Overview

In the post about my last IBM course I wrote a bit about the lecture's consulting job. He told me how his life looks if he isn't busy on teaching some courses to other it-people and that's the topic of this post. Certificates, it's all about certificates. In his job he has to constantly learn about new technologies and get the corresponding certificates for those technologies. I mean how cool is that, the fact to always learn something new and then you'll be able to teach about it. So, that's why I tried to figure out how am able to get such certificates in Vienna, how difficult those are and of course how much they cost.

Because I love Java I first got onto the Sun Microsystems website to get an overview about all offered certificates and will always get a good description about the course's preconditions and so on. My problem was, or better my problem is, to figure out how much those certificates are. I mean, Sun only presents the corresponding course-price for the certificate but as I heard it is possible to get those certificates without doing the course by only passing the exam. So, I searched through the WIFI website where I had my last IBM course. In the following link-list you will find a pricelist but this list is provided by a WIFI of another federal state, hence not from Vienna.

Because today is Saturday I won't be able to call the WIFI's Information Center but on Monday I'll try to get more information about the certificates. In the pricelist the Java Certificates are all about 51 bucks so that's pretty affordable. I will let you know if I have found more information on getting a Java Certificate in Vienna. Of course you are welcome to post your experiences in this section.

Sun Java Certificates: Total Overview

WIFI:

Sun Certified Java Associate

  • Total Overview: SCJA
  • Online Test-Questions: SCJA Sun Certified Java Associate Mock Exams

This link-list will be extended as soon I have more information.

Cheers and good night.

Upcoming Events

There will be two pretty cool events within the next two months which I really look forward to. The first event is about Agile Software Development with Visual Studio Team System and is held on the 30th January in Vienna. To get detailed information please visit the following website: MSDN Austria. The second event is an international conference on Java Server Faces and is called JSFDays08. It will also take place Vienna from March 12th to 14th. To get more information visit the event's official website: JSFDays08. Hope to cu there ;-)

Cheers

Saturday, January 12, 2008

NetBeans and JacORB

Today I'd like to show you how you can run your first CORBA application in NetBeans 6.0 without any additional IDE-Plugins but don't expect a CORBA tutorial because this would be an issue for more than one blog post. Besides you will find a really good and detailed documentation in your JACORB_HOME\doc directory. First of all I'd like to provide the links where you can find all necessary resources for this tutorial.

Resources:

Requirements:

  • Java SDK ;-)
  • Installed NetBeans IDE
  • Added JACORB_HOME to your system-properties

I will use a demo application (grid) which you will find in the JACORB_HOME\demo directory. Because I only want to show you how to bring your CORBA installation up and running I won't implement an application from scratch. After you have prepared all configurations it would be very easy for you to implement a new Java application. So let's start by creating a new Java-Project in your NetBeans IDE. I simply called it 'Grid'. Now you have to add all the necessary JacORB-libraries which you will find under JACORB_HOME\lib into your IDE and add it to your project's classpath.

Necessary Libraries:

  • avalon-framework-4.1.5.jar
  • jacorb.jar
  • idl.jar
  • logkit-1.2.jar

The next step is to create the necessary java-packages ('demo.grid') for the demo-application and then simply copy the demo-app's sources to the demo.grid package.


Files to copy:

  • Client.java
  • Server.java
  • TieServer.java
  • gridImpl.java
  • gridOperationsImpl.java
  • server.idl

After you've copied all the necessary files, create a new folder in your project, I called it 'cust'. Download and save the following file into this new folder. This file is a custom ant-build.xml file for your application. It provides targets e.g. to start the namespaces-server, to invoke the idl-compiler pointing to your server.idl which will generate all necessary stub-classes for the corba-application.

Build.xml

I've changed the module structure in the sever.idl file by adding a new module (which will be a generated java-package) called 'gen'. That's because I'd like to have the generated artefacts in a separated package.

server.idl:

module gen {
module demo
{
module grid
{
interface MyServer
{
typedef fixed <5,2> fixedT;
readonly attribute short height; // height of the grid
readonly attribute short width; // width of the grid

// set the element [n,m] of the grid, to value:
void set(in short n, in short m, in fixedT value);

// return element [n,m] of the grid:
fixedT get(in short n, in short m);


exception MyException { string why; };

short opWithException() raises( MyException );
};
};
};};

The following picture shows how your folder-structure should now look like.


Now, open your custom build.xml and run the 'idl-compile' target in the navigator-view of your IDE. This will compile your server.idl and generate all necessary stub-classes to run your application. Your application should still have some errors. That's because we've changed the server.idl and hence the java-package structure and all the dependencies of your java-files can't be resolved because they aren't pointing to gen.demo.grid. You will be able to solve those errors by open up each java-file and press Ctrl+Shift+I to fix all imports.

You now should still have some errors. That's because some packages have been hardcoded in the demo-application. Just rename those packages from demo.grid to gen.demo.grid. Then there should be no errors anymore and you will be able to run the application and those are the steps to complete this tutorial:

  1. run compile target
  2. run run-ns target
  3. run run-grid-server target
  4. run run-grid-client target

Then you should see something like the following screen shows:


From here this is a good starting point to go through the JacORB's documentation and study all the demo app's sources. Then you will have a pretty good understanding on how CORBA works. Of course CORBA is a pretty complex technology but there are many more demo applications which you will find under the JACORB_HOME\demo directory. So enjoy coding CORBA apps with NetBeans IDE.

Cheers

Wednesday, January 09, 2008

My X-Mas Presies

I hope your Christmas holidays were also as recreative as mine were although I had a lot of university work to do and still I haven't finished all of it. I'm really looking forward to February because in that month I'm going to post a lot of code and new developing-experiences since I have got a lot of new books for Christmas. This post will be a short one and I only want to list my presies which I got. Here we go:


So that's about it although I bought myself a book a couple of weeks ago about the NetBeans Platform. This is also the book which I'm currently reading. It's about developing a RCP Application on top of the NetBeans Platform. It's very well written I've already learned about the Platform's architecture, the concept about the Module System, Actions, Application design, the Lookup concept, the data-representation and currently I'm reading about how to create graphical components such as custom dialogs, wizards and Multi View Top Components. The next chapter is about the Visual Library which I really look forward to learn about.


In other news. Check out this website. It provides 24 new german developing books by Entwickler Press (=publisher). This was a Christmas present from the mentioned publisher but each book only was online for one day. A very friendly developer put those books on a public share so now you will be able to download them whenever you want. Also check out this message about the collaboration work from my university (TU-Vienna) and the MSDN AA and how you (all TU-students) will be able to download free MS Software (e.g. Visual Studio 2008 !!!!!!) Hurray!!!!

Cheers

Saturday, December 08, 2007

NetBeans 6.0 | A little JPA Example

In this post I'd like to show you how to use JPA in NetBeans within a Java SE application. First of all you have to create a database and call it something like TestDB. I called my database 'Medienverwaltung' because I did a small JPA-tutorial from the new Javamagazin which had exactly the same database.


Create a very simple table without any references on other tables and call it 'ACTOR'. That's all you need for a first little JPA test. Now, create a JavaApplication in NetBeans. I called my application 'JPAGenTest'.


The next step is to generate an Actor-Entity-Class which will map the data into the corresponding 'ACTOR'-table in your database. A lot of errors will show up. That's because the necessary libraries are still missing.


You can import them by configure your libriaries within the IDE or you create the persistent-unit and the libs will be imported automatically. You have to create this persistent unit anyway so I've decided to create it to import the missing libs.


Now all errors are gone and you will be able to create more JPA functionality. The next step is to implement a Manager-Class which handles the JPA persistence-context. That means this class is responsible to provide CRUD functionality for your actor-instances and to communicate with your database.


I've named this kind of class 'ActorManager' and implemented the following typically methods to interact with my database:
  • createActor
  • findById
  • findByFirstname (NamedQuery)
  • findByLastname (NamedQuery)
  • updateActor
  • removeActor
  • getAll
  • removeAll

NamedQuery is a JPA-Feature which was automatically created by NetBeans when you've created your Enitity-Class. It's a simple JPQL statement which usually will be used more often in your application.

Here is the code from the ActorManager:


package com.blogspot.sageniuz;

import java.util.Iterator;
import java.util.List;
import javax.persistence.EntityManager;
import javax.persistence.EntityManagerFactory;
import javax.persistence.Query;

/**
* Actor-Manager
* @author Claus Polanka
*/
public class ActorManager {

private EntityManager em;

public ActorManager(EntityManagerFactory emf) {
em = emf.createEntityManager();
}

public void createActor(ActorGenEntity actor) {
em.getTransaction().begin();
em.persist(actor);
em.getTransaction().commit();
}

public ActorGenEntity findById(Integer id) {
return em.find(ActorGenEntity.class, id);
}

public List findByFirstname(String firstname) {
Query query = em.createNamedQuery("ActorGenEntity.findByFirstname");
query.setParameter(firstname, em);
List listOfActors = query.getResultList();
return listOfActors;
}

public List findByLastname(String lastname) {
Query query = em.createNamedQuery("ActorGenEntity.findByLastname");
query.setParameter(lastname, em);
List listOfActors = query.getResultList();
return listOfActors;
}

public void updateActor(ActorGenEntity actor) {
em.getTransaction().begin();
em.merge(actor);
em.getTransaction().commit();
}

public void removeActor(ActorGenEntity actor) {
em.getTransaction().begin();
em.remove(actor);
em.getTransaction().commit();
}

public List getAll() {
Query query = em.createQuery("select a from ActorGenEntity a");
List list = query.getResultList();
return list;
}

public void removeAll() {
em.getTransaction().begin();
Query query = em.createQuery("select a from ActorGenEntity a");
List list = query.getResultList();
Iterator it = list.iterator();
while (it.hasNext()) {
ActorGenEntity actor = it.next();
em.remove(actor);
}
em.getTransaction().commit();
}

public void close() {
em.close();
}
}


Testing the application is the next thing to do, so let's create a JUnit test-clase. Before you start implementing it check if you have already imported you database-driver or you will get an exception when executing your JUnit-test.


Here is the code for my test-class:


package com.blogspot.sageniuz;

import java.util.List;
import javax.persistence.EntityManager;
import javax.persistence.EntityManagerFactory;
import javax.persistence.Persistence;
import junit.framework.TestCase;

/**
* CRUD Test for Actor-Class.
* @author Claus Polanka
*/
public class TestActorManager extends TestCase {

private ActorManager am;
private EntityManager em;
private EntityManagerFactory emf;

private static final ActorGenEntity TESTACTOR1 = new ActorGenEntity(1, "Claus", "Polanka");
private static final ActorGenEntity TESTACTOR2 = new ActorGenEntity(2, "Barbara", "Ebinger");
private static final ActorGenEntity TESTACTOR3 = new ActorGenEntity(3, "Irene", "Polanka");

public TestActorManager(String testName) {
super(testName);
}

@Override
protected void setUp() throws Exception {
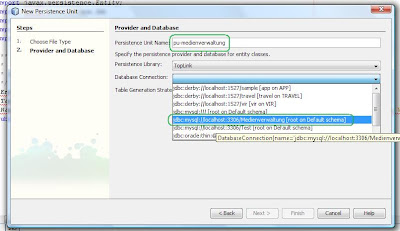
emf = Persistence.createEntityManagerFactory("pu-medienverwaltung");
em = emf.createEntityManager();
am = new ActorManager(emf);
}

@Override
protected void tearDown() throws Exception {
am.close();
em.close();
emf.close();
}

public void testCRUD() {
am.createActor(TESTACTOR1);
ActorGenEntity actor = am.findById(1);
assertEquals(actor.getFirstname(), "Claus");

actor.setFirstname("Barbara");
am.updateActor(actor);

actor = am.findById(1);
assertEquals(actor.getFirstname(), "Barbara");

am.createActor(TESTACTOR2);
am.createActor(TESTACTOR3);

List list = am.getAll();
assertEquals(list.size(), 3);

am.removeAll();
list = am.getAll();
assertEquals(list.size(), 0);
}
}

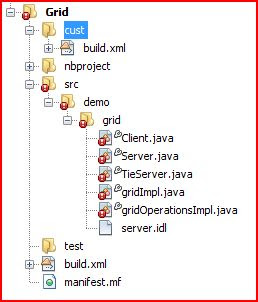
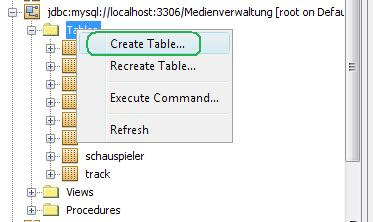
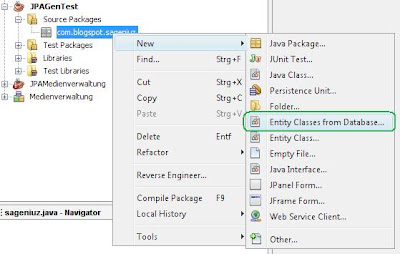
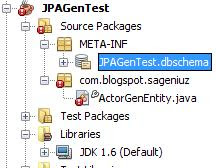
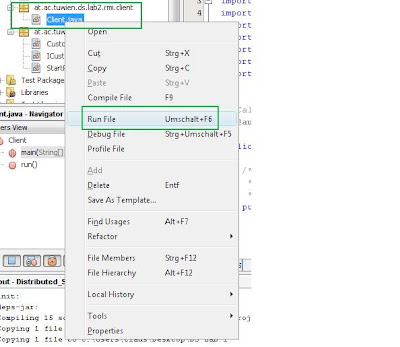
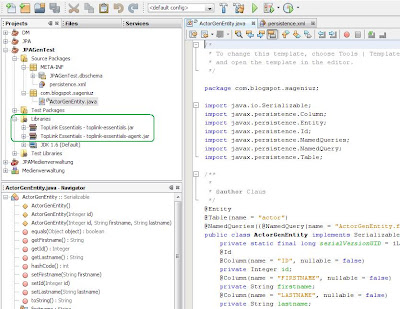
The following picture shows my project-tree and how your project-structure should also look like.


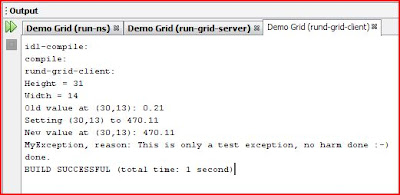
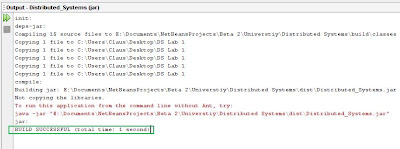
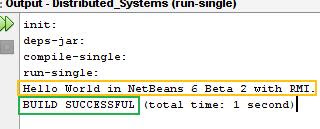
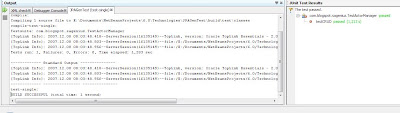
After running your test you should see something like the following.


In the next days I will test more of the JPA features like support for derived Entities and stuff like that.

Cheers

Tuesday, November 13, 2007

Java Rules Engines | Words and Phrases

This Posting is about the book which I'm currently reading. (Java Rules Engines) The Post summarizes some words or phrases which were new to me and I'd like to remember them. Because I even didn't know those in german I'm going to sum them up in german.

Kapitel 1 Buch Seite 15: virale Ansätze.
Ein Viral ist ein Werbespot, der eigens für das Internet produziert wird. Sein Name leitet sich ab von der Werbeform, innerhalb derer er konzipiert und eingesetzt wird, dem viralen Marketing

Kapitel 1 Buch Seite 15: kognitive Fähigkeiten:
Der Begriff kognitiv stammt aus der Psychologie und bezeichnet solche Funktionen des Menschen, die mit Wahrnehmung, Lernen, Erinnern und Denken, also der menschlichen Erkenntnis- und Informationsverarbeitung in Zusammenhang stehen.

Kapitel 1 Buch Seite 20: Konsekutivsätze:

Das Adjektiv konsekutiv bedeutet soviel wie zeitlich folgend, von einer vorherigen Gegebenheit abhängig.

Kapitel 1 Buch Seite 23: Omnipotente Schnittstelle:

Mit Allmacht, Allmächtigkeit oder Omnipotenz wird die Fähigkeit eines Wesens bezeichnet, jedes Ereignis auch jenseits naturwissenschaftlicher Erklärbarkeit in Gang zu setzen oder zu beeinflussen.

Kapitel 1 Buch Seite 25: Profan:

Es bezeichnet im eigentlichen Sinne die Eigenschaft von Objekten oder Handlungen, die nicht im Zusammenhang mit einem Kult stehen, die keine rituelle oder religiöse Bedeutung tragen und denen keine magischen Eigenschaften und Wirkungen zugesprochen werden.

To be continued...

Monday, November 12, 2007

RMI with NetBeans 6 Beta 2

Please don't let mislead you because of this post's title. NetBeans doesn't have any special features for RMI support. I've only chosen this title because I'm going to develop my RMI-Service in NetBeans 6 Beta 2 which is my favourite IDE.

I won't explain every detail of RMI because you will find a lot of good tutorials on the web anyway. So, the first step is to open your IDE and develop the Interface for your RemoteService:


Second step: Write your service implementation class.


package at.ac.tuwien.ds.lab2.rmi.server;

import java.rmi.RemoteException;
import java.rmi.server.UnicastRemoteObject;

/**
* Implementation of ICustomRemot Interface.
* @author Claus Polanka
*/
public class CustomRemoteImpl extends UnicastRemoteObject implements ICustomRemote {

/**
* Necessary because Super-Class constructor throws RemoteException.
* @throws java.rmi.RemoteException Will be thrown if there are some network
* errors.
*/
public CustomRemoteImpl() throws RemoteException {
}

/**
* Returns a string which say 'Hello World with NetBeans 6 Beta2 and RMI.'
* @return the string which holds the value.
* @throws java.rmi.RemoteException Will be thrown if there are some network
* problems.
*/
public String sayHello() throws RemoteException {
return "Hello World in NetBeans 6 Beta 2 with RMI.";
}
}


Next step ist to implement a class who starts your remote service:


package at.ac.tuwien.ds.lab2.rmi.server;

import java.net.MalformedURLException;
import java.rmi.Naming;
import java.rmi.RemoteException;
import java.util.logging.Level;
import java.util.logging.Logger;

/**
* Starts the CustomRemote Service.
* @author Claus Polanka
*/
public class StartRemoteService {

/**
* @param args the command line arguments
*/
public static void main(String[] args) {
try {
ICustomRemote service = new CustomRemoteImpl();
Naming.rebind("HelloWorldService", service);
} catch (RemoteException ex) {
Logger.getLogger(StartRemoteService.class.getName())
.log(Level.SEVERE, null, ex);
} catch (MalformedURLException ex) {
Logger.getLogger(StartRemoteService.class.getName())
.log(Level.SEVERE, null, ex);
}
}

}


Now, after you have finished the serverside of your RMI application, it's time to develop the client who calls the service.


package at.ac.tuwien.ds.lab2.rmi.client;

import at.ac.tuwien.ds.lab2.rmi.server.ICustomRemote;
import java.net.MalformedURLException;
import java.rmi.Naming;
import java.rmi.NotBoundException;
import java.rmi.RemoteException;
import java.util.logging.Level;
import java.util.logging.Logger;

/**
* Calls my RemoteService.
* @author Claus Polanka
*/
public class Client {

/**
* Makes a lookup and gets the String of the RemoteServcie.
*/
public void run() {
try {
ICustomRemote remoteService = (ICustomRemote)
Naming.lookup("rmi://127.0.0.1/HelloWorldService");

// Calls remote method.
String remoteString = remoteService.sayHello();

System.out.println(remoteString);

} catch (NotBoundException ex) {
Logger.getLogger(Client.class.getName()).log(Level.SEVERE, null, ex);
} catch (MalformedURLException ex) {
Logger.getLogger(Client.class.getName()).log(Level.SEVERE, null, ex);
} catch (RemoteException ex) {
Logger.getLogger(Client.class.getName()).log(Level.SEVERE, null, ex);
}
}

/**
* @param args the command line arguments
*/
public static void main(String[] args) {
Client client = new Client();
client.run();
}
}


Now, compile everything and you should see something like the following output:


So, if you have the same environment as I have (only one machine ;-) you don't have to copy anything to another location. Just generate the Service Stub-Class, start the rmiregistry and start your service. Then your client should be able to execute the Service and print out it's result which is in my case a simple string.

Generate Stub-Class:


Now, you should be able to see a new generated class in corresponding package where you have generated the Stub.


Start the RMI-Registry to register the Service.


Start your service and bind it to your registry.


Let's run the Client.


And see the result.


Hope you liked it.

Cheers