Showing posts with label University. Show all posts

Saturday, January 12, 2008

NetBeans and JacORB

Today I'd like to show you how you can run your first CORBA application in NetBeans 6.0 without any additional IDE-Plugins but don't expect a CORBA tutorial because this would be an issue for more than one blog post. Besides you will find a really good and detailed documentation in your JACORB_HOME\doc directory. First of all I'd like to provide the links where you can find all necessary resources for this tutorial.

Resources:

Requirements:

  • Java SDK ;-)
  • Installed NetBeans IDE
  • Added JACORB_HOME to your system-properties

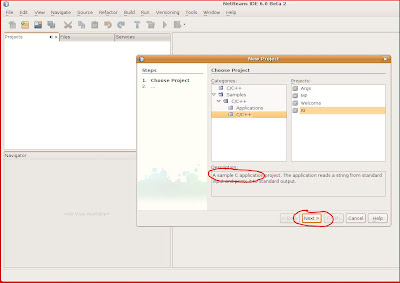
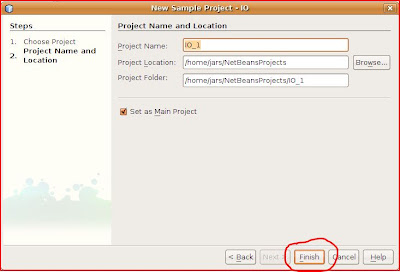
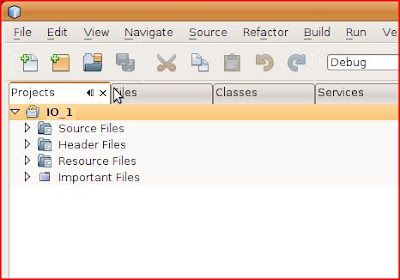
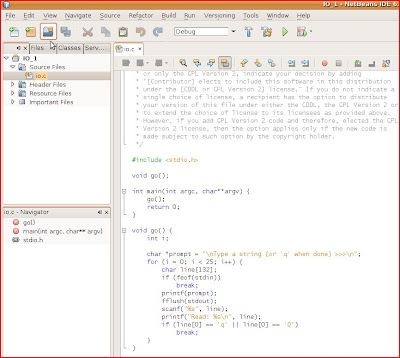
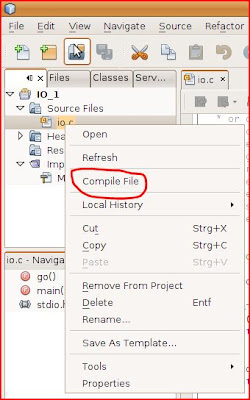
I will use a demo application (grid) which you will find in the JACORB_HOME\demo directory. Because I only want to show you how to bring your CORBA installation up and running I won't implement an application from scratch. After you have prepared all configurations it would be very easy for you to implement a new Java application. So let's start by creating a new Java-Project in your NetBeans IDE. I simply called it 'Grid'. Now you have to add all the necessary JacORB-libraries which you will find under JACORB_HOME\lib into your IDE and add it to your project's classpath.

Necessary Libraries:

  • avalon-framework-4.1.5.jar
  • jacorb.jar
  • idl.jar
  • logkit-1.2.jar

The next step is to create the necessary java-packages ('demo.grid') for the demo-application and then simply copy the demo-app's sources to the demo.grid package.


Files to copy:

  • Client.java
  • Server.java
  • TieServer.java
  • gridImpl.java
  • gridOperationsImpl.java
  • server.idl

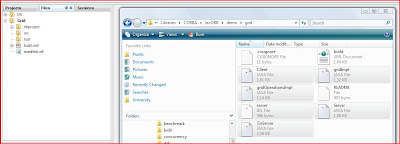
After you've copied all the necessary files, create a new folder in your project, I called it 'cust'. Download and save the following file into this new folder. This file is a custom ant-build.xml file for your application. It provides targets e.g. to start the namespaces-server, to invoke the idl-compiler pointing to your server.idl which will generate all necessary stub-classes for the corba-application.

Build.xml

I've changed the module structure in the sever.idl file by adding a new module (which will be a generated java-package) called 'gen'. That's because I'd like to have the generated artefacts in a separated package.

server.idl:

module gen {
module demo
{
module grid
{
interface MyServer
{
typedef fixed <5,2> fixedT;
readonly attribute short height; // height of the grid
readonly attribute short width; // width of the grid

// set the element [n,m] of the grid, to value:
void set(in short n, in short m, in fixedT value);

// return element [n,m] of the grid:
fixedT get(in short n, in short m);


exception MyException { string why; };

short opWithException() raises( MyException );
};
};
};};

The following picture shows how your folder-structure should now look like.


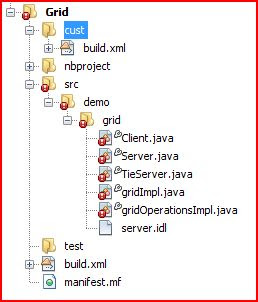
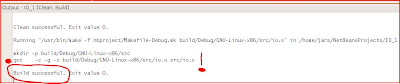
Now, open your custom build.xml and run the 'idl-compile' target in the navigator-view of your IDE. This will compile your server.idl and generate all necessary stub-classes to run your application. Your application should still have some errors. That's because we've changed the server.idl and hence the java-package structure and all the dependencies of your java-files can't be resolved because they aren't pointing to gen.demo.grid. You will be able to solve those errors by open up each java-file and press Ctrl+Shift+I to fix all imports.

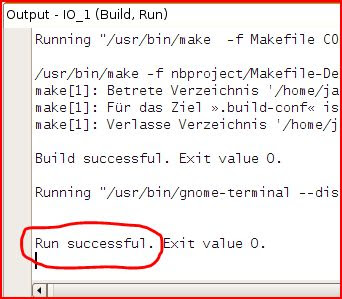
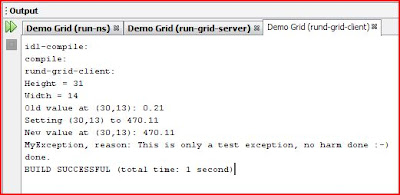
You now should still have some errors. That's because some packages have been hardcoded in the demo-application. Just rename those packages from demo.grid to gen.demo.grid. Then there should be no errors anymore and you will be able to run the application and those are the steps to complete this tutorial:

  1. run compile target
  2. run run-ns target
  3. run run-grid-server target
  4. run run-grid-client target

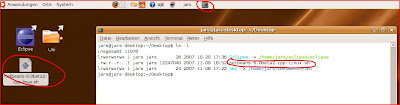
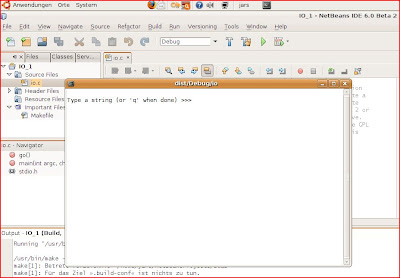
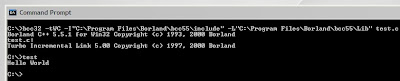
Then you should see something like the following screen shows:


From here this is a good starting point to go through the JacORB's documentation and study all the demo app's sources. Then you will have a pretty good understanding on how CORBA works. Of course CORBA is a pretty complex technology but there are many more demo applications which you will find under the JACORB_HOME\demo directory. So enjoy coding CORBA apps with NetBeans IDE.

Cheers

Wednesday, November 21, 2007

How 2 Test PL/SQL with Oracle 10g | Part 1

In this post I'm going to show you how to test simple PL/SQL queries on an Oracle 10g database. Because this year I focus on databases I've decided to attend 'Database Management Systems' which is a lecutre at my university.

This lecture or better the responsible institute provides an Oracle 10g database for all students who'd like to complete the corresponding exercise. Here is the description of the first exercise. I had to design a (small) complete database including EER-Diagram, relations, CREATE TABLE, DROP TABLE and INSERT INTO statements.

So, if you already have designed the EER-Diagram and corresponding database-relations you have to implement the necessary sql-files and execute them on the server which is provided by the lecture's institute. I focus on showing you how to test under Windows Vista.

The first step I had to do I had to download a ssh-client for my OS to connect to the universities' server. I chose Putty because I'm a experienced on using this client. After I've successfully installed Putty I tried to connect to the server by opening a new session.


I've entered my creds and finally I successfully was connected.


Then I've create a test directory where I wrote my first create_table.sql file with vim.


In the next step I've started a new Putty-Connection to run the table script by entering 'slqp' on the command-line. Again I had to enter my creds for this SQLPlus session.


The first command which you should enter is the 'SET SERVEROUTPUT ON' command to get the corresponding output of the server after you have executed a query.


Then I've testet my create_table.sql file by typing 'start PATH_TO_FILE/create_table.sql'. If your sql-file successfully executed you can type 'exit' to exit the SQLPlus session.


To be continued ...

Friday, November 09, 2007

C Coding with NetBeans under Ubuntu 7.10

In this post I'd like to write about how to install NetBeans 6 Beta 2 under Ubuntu 7.10 Codename Gutsy Gibbon and how to use my favourite IDE for c/c++ coding. The first step is to go to the NetBeans Homepage and download the installables.

I've chosen the IDE in combination with the C/C++ Package. As you can see this constellation is very small (11 MB) but remember you won't be able to use it for Java Apps but of course you'll be able to download all plugins for NetBeans after you have installed the IDE.


Save the packages to your desktop and open a terminal in Ubuntu. Change to your Desktop directory and then you should be able to see something like the following picture. Then type the command (which you can find in my terminal in the third picture) in your terminal and press Enter. Command: sudo sh netbeans-package.sh


After calling this command in your terminal, a installation-wizard should pop-up and you just have to click yourself through this wizard. As you can see, it is very simple to install the IDE in Ubuntu.


If the wizard has finished you have to execute a shell-file in the installation's bin-directory. After double-clicking this file a new pop-up will be shown. Here you just have to click on 'Ausführen' (Execute) and the IDE finally should start.


Now you'll be able to create an sample c-application which you'll find under File/New Project/Samples/C/C++/C/C++/IO. After creating this application you'll see the project-structure in your NetBeans-Projects-Tab and if you open your Source Files oi.c file you can see the c-code with Syntax Highlighting.


Now you can compile the file by right clicking it and chose Compile File to compile it. If there are no errors (and ther should be no errors) you should see something like Build Successful in you Output-Window. Then try to run the application by clicking the green Play-Button which you can find on the toolbar of your IDE.

This will execute the Main-Project (your c-project) and a terminal window should pop-up where you should be able to type something. After clicking Enter your input will be printed out to the same terminal and if you want to quit the application just type a q and presse enter.


I hope you liked this tutorial and of course you can find more information on how to install the NetBeans-IDE in Ubuntu on the Netbeans-Wiki. This article will also describe the requirements which I didn't mention in my post e.g. you have to check if you have a working java version installed on your Ubuntu-System and so on.

Have nice weekend
Cheers

Monday, July 09, 2007

Thursday, May 31, 2007

DOM und SAX

DOM war von Anfang an als eine plattform- und sprachunabhängige Schnittstellenbeschreibung für den Zugriff auf XML-Dokumente (und auf HTML) konzipiert.

SAX wurde zunächst nur als Java-API entwickelt, die aktuelle Version liegt aber auch in Varianten für andere Entwicklungsumgebungen vor.

Diese beiden Techniken sind vom Ansatz her grundverschieden. Die größe des XML-Dokuments spielt für SAX keine Rolle da immer nur eine Zeile (sequenziell) aus dem Dokument verarbeitet wird. SAX erlaubt daher eine schnelle Verarbeitung des gesamten Dokuments in einem Durchgang.

Um eine gezielte Bearbeitung bestimmter Stellen im Dokument oder Sprünge von einer Stelle zu anderen gewährleisten zu können muss man DOM verwenden. DOM erlaubt nicht nur das Herumspringen sondern auch das Einfügen von neuen Knoten.

Man kann natürlich auch beide Technoligien miteinander kombinieren.
Wann SAX?
  • Wenn das XML-Dokument lineare Daten repräsentiert. (Keine tiefen Verschachtelungen)
  • Bei großen XML-Dokumenten. (Der Parser sieht nur ein kleines Stück des XML-Dokuments auf einmal)
  • Wenn eine fein abgestimmte Steuerung benötigt wird.

DOM ist mit Hilfe der der sprachunabhängigen Interface Definition Language definiert worden.

Tuesday, May 08, 2007

Valid, Valid, Valid

As I wrote in my last post about my lil xml-project at university and that I've learned something new about namespaces and xsd-files: you can change the prefix in an xml-instance of a xsd-file and the xml-instance still stays valid. Check the following code-snippets:

First the XSD:

From Misc


And here is the XML-Instance with the same prefix as in the XSD ...

From Misc


... and here after I've changed the prefix:

From Misc


So the 'tutor' at university was right and I really have learned something new... yeah!

Keep coding ... Cheers

Monday, May 07, 2007

How to integrate Namespaces...

... into a Document Type Definition.

Because of one lecture at University (Semistrukturierte Daten) I had to implement some very easy XML-Stuff. One thing I couldn't remember was how to integrate a Namespace-Definition in a DTD. Of course I know that if you define a Präfix and an URI for a Namespace in a DTD essentially means to just define a new name for the element which you would like to have in a corresponding XML-Instance of your DTD. Checkout the following code-snipped:

From Misc

Also you must declare the Präfix (in my case 'dbai') for all Elements which also should use this Namespace in your XML-Instance. The bottom line is that I received all points for the exercise (I'd like to show off ;o) and that I would prefer more of such easy university-projects.

Ahh ... One thing I've learned and I still have to check out is that if you declare a Namespace in a XSD und you change the präfix of the Namespace in you XML-Instance the XML-File still must be valid. Hmmm.. we'll see!

So long...

Friday, March 30, 2007

Gettin' started with C

So far the following description will describe a very fast way how to compile a c-application under windows. You just have to install the Borland C Compiler which you can find under the following link: Borland C Compiler By the way you will find a detailed german description under next link: German Description

After the registration at Borland you will be redirected to the download-page. Just get the the compiler-package and install it. Add the path of the install-directory to your env-vars and type 'bcc32' to the command line.

You then should be able to see the tool's version and the command line options. Write a simple c-application and then type the following to compile your application:

From C Programming

After your programm compiled successfully you should see some output like this:

From C Programming

Hopefully this helps you to get started with C.
Cheers

Tuesday, March 13, 2007

SYSPROG | Block zum 1. Übungsbeispiel

This lesson was presentet by Raimund Kirner and the lesson's topic was "Block zum 1. Übungsbeispiel" and hence I thought the first exercise of this lecture would be described in detail but I was wrong.

Raimund Kirner explained some very basic features of the C programming language. E.g. example very simple c-commands were discussed (getopt, stderr, printf, fflush, ferror, fopen, fread, fwrite) and also simple i/o-operations were explained in detail.

Topics (german):
  • Argumentenbehandlung
  • Umgang mit Fehlern
  • I/O, Dateioperationen
  • Message Queues, Named Pipes
  • Signalbehandlung
The teacher's presentation style was very boring but I think that's quite normal for the presentation style at the Technical University of Vienna although I can't think of a more interesting way to present these kind of topics.

2-morrow (14th March) the first exercise will be announced and the students will be able to get their student-accounts during the official lab opening-times (Wedn. 10:00-13:00 hrs.) for this lecture.

For further information you must to check the official lab-hompage.

Cheers

Sunday, December 17, 2006

Monday, December 04, 2006

Persistent vs. Transient

Im Rahmen der LVA 'Einführung in Semantic Web', musste man bei der ersten Übung eine Ontologie modellieren und eine Frage bezüglich der zu modellierenden Instanzen war folgende: "Ist eine Kommunikation zwischen zwei Personen mittels Applikation persistent?" Hierzu muss man jedoch wissen, was persistente Kommunikation eigentlich bedeutet. Tante Google meint:

Die persistente Kommunikation ermöglicht das Zwischenspeichern von Nachrichten im Kommunikationssystem, d.h. diese Nachrichten werden solange im Kommunikationssystem gespeichert, bis sie zum Empfänger übertragen werden können.

Entscheidend dabei ist jedoch, dass der Empfänger zum Zeitpunkt an dem der Sender die Nachricht abschickt, nicht aktiv sein muss. Genauso muss der Sender nicht aktiv sein, wenn der Empfänger die Nachricht entgegennimmt.

Bei der persistenten Kommunikation gehen daher keine Nachrichten verloren, diese Kommunikationsform bietet sozusagen eine Übertragungsgarantie.

Im Vergleich zur persistenten Kommunikation erlaubt die transiente Kommunikation eine Übertragung nur dann, wenn sowohl Sender als auch Empfänger zum Zeitpunkt der Nachrichtenübermittlung aktiv sind. D.h. es werden die Nachrichten nur solange im Kommunikationssystem zwischenspeichert, solange beide Prozesse aktiv sind.

Wieder etwas gelernt...!

Friday, December 01, 2006

Semantic Web | Übung 1 | Sachverhalt

Die folgenden Diagramme dienen nur zum besseren Verständnis des Sachverhalts der ersten Übung der Vorlesung "Einführung in Semantic Web" und entspricht daher nicht der UML 2.0 Notation.


Klassendiagramm zum Erfassen der Entitäten

Monday, November 27, 2006

RMI | Wichtige Punkte

  • Mit Java Remote Method Invocation (RMI) kann man scheinbar eine Methode auf einem entfernten Objekt (d.h. einem Objekt in einer anderen Java Virtual Machine) aufrufen - aber es scheint eben nur so.
  • Wenn ein Client eine Methode auf einem entfernten Objekt aufruft, ruft er in Wirklichkeit eine Methode auf einem Proxy des Remote-Objekts auf. Den Proxy bezeichnet man als "Stub".
  • Ein Stub ist ein Client-Helfer-Objekt, das sich um die Lowlevel-Netzwerk-Einzelheiten (Sockets, Ströme, Serialisierung usw.) kümmert, indem es Methodenaufrufe packt und an den Server sendet.

FIRST BASELINE

Attendend Subjects

Sunday, November 19, 2006

Daten- und Informatikrecht | Aufgabe 02

Aufgabenstellung:
  • Erkunden Sie die Funktionsweise von Tunebite Premium
  • Suchen Sie die relevanten §§ des UrhG (idgF) im RIS. (Anmerkung: Das selbständige Erlernen der Recherche im RIS ist Teil der Aufgabe.)
  • Prüfen Sie in weiterer Folge die aufgeworfene Rechtsfrage.
  • Formulieren Sie Ihre Stellungnahme an Ihren Kollegen als E-Mail inklusive Begründung (siehe unten!).
Hinweis: In der Stellungnahme sollten also die wichtigsten/relevanten Aspekte der Software in wenigen Worten zusammengefasst, die relevanten §§ des UrhG angeführt sowie Ihre Stellungnahme samt fundierter Begründung enthalten sein.

Aus rechtlichen Gründen ist es mir nicht gestattet vor Abgabe der Aufgabe mein Lösung zu posten, jedoch kann man unter dem folgenden Link einen sehr nützlichen Artikel des LEX:ITEC-Magazins nachlesen, der mit Sicherheit eine gute Grundlage für den Wissensbedarf für Aufgabe 02 darstellt.

LEX:ITEX-Artikel der aktuellen Ausgabe


Übrigens bin ich erstmalig auf dieses Magazin während ausführlicher Internetrecherche für meine Lösung dieser Aufgabe gestossen. Es ist handelt sich um eine Fachzeitschrift für Recht und Informationstechnologie und falls man das Magazin und die Hompage nicht kennt, sollte man unbedingt einmal einen Blick riskieren.

cheers

Sunday, October 29, 2006

Software-Qualitätssicherung | Eingangsphase

In der Eingangsphase dieser LVA musste ich ein Review über einen wissenschaftlichen Artikel verfassen. Das Thema des Artikels: "Visualization-based Analysis of Quality for Large-scale Software Systems". Der Artikel handelt von ein paar Software-Entwicklern die ein Framework erstellt haben, um komplexen objektorientierten Code visuell zu analysieren. Ich habe ein paar beeindruckende Bilder aus dem Artikel kopiert:

(Top) Mdified Treemap technique and (bottom) modified Sunburst technique.

Representation of the evolution, from left to right, of a package over 23 versions. It represents Quantum, a database access plugin for Eclipse (689 classes).

Example of the Treeline algorithm. It represents EMMA, a tool for measuring coverage of Java software (286 classes).

Unter dem folgenden Link kann man den Artikel downloaden und selbst einen Blick auf dieses beeindruckende Framework werfen. Artikel Auch mein Review kann unter dem foldenden Link heruntergeladen werden. Review Nur zur Information: Ich habe 15/15 Punkten erhalten ;o) So sollten Übungen an der Universität immer verlaufen: Interessante Themen und gut bewertet!

Da es zwei LVAs in Software-Qualitätssicherung gibt, und es sich bei dieser um die fortführende Version handelt, musste ich natürlich in der eigentlichen LVA ebenfalls eine Übung erledigen. Ich musste mich das erste Mal mit dem Thema Dynamisches Testen (Blackbox-Testing, Äquivalenzklassenbildung, Grenzwertanalyse) auseinander setzen. Eigentlich ein sehr interessantes Thema, jedoch extrem mühsam zu erlernen. Als Quelle um mir das notwendige Wissen anzueignen habe ich folgende Literatur verwendet:

In diesem Buch werden die Dynamischen Testverfahren ausgezeichnet beschrieben und sind daher relativ leicht zu erlernen. Warum 'relativ'? Es handelt sich bei diesen Verfahren um etwas komplexere Verfahren und aufgrund von Zeitdruck musste ich mir das Wissen in sehr kurzer Zeit aneignen. Ich werde mich mit diesem Thema mit Sicherheit noch einmal auseinander setzen müssen.

Bei der Übung dieser LVA musste ich aus drei Spezifikationen eine wählen und Blackbox-Tests durchführen. Ich werde hier nicht genauer auf diese Übung eingehen, aber wer will kann sich unter den folgenden Links, sowohl die Spezifikation, als auch meine Lösung downloaden.

So, genug mit Testen für heute...!

Cheers

Thursday, October 19, 2006

E-Commerce Technologies | XML, XSL, XSD

Finally I've finished the first exercise of the course 'e-commerce technologies' where we had to create three xml-schema, one xml-example and an corresponding xslt-file which transforms the xml-file into a xhtml-file.

The following diagram shows the most interesting xsd-file (from my point of view). For a more detailed specification of this exercise, visit the following link: Specification. I've alo created a documentation where you can have a better overview of my solution. If you have ideas how to improve my solution feel free to post me.


edi.xsd


Under the following link you can download my solution: e-commerce xml-exercise

cheers

Monday, October 02, 2006

Time-Table WS 2006/2007 | New Final Design

Because there were some mistakes in the final version of my time-table for the first week and for the first month, I had to refactor it. Here is the final, final version ;o)

Time-Table, First week


Time-Table, First Month


Cheers

Monday, September 25, 2006

Time-Table WS 2006/2007 | Detailed Overview

As I promised here is a final detailed overview of each lecture I would like to attend this semester. From now on I will switch to german for a better understanding.

  • Systemnahes Programmieren
Ziel der Lehrveranstaltung
Erlernen der Programmierung von Betriebssystemfunktionalität.
Programmierung praktischer Beispiele unter UNIX/Linux.

Inhalt der Lehrveranstaltung
Programmierung in der Systemprogrammiersprache C, Programmier konventionen und Richtlinien, Betriebssystem-Programmierung und Programmierumgebungen (UNIX), Hardware-nahe Programmierung.
Im praktischen Teil der LVA sind 3 Beispiele zu diesen Themen programmieren, in denen Folgendes geuebt wird: C-Programmierung, Synchronisation paralleler Prozesse, Interprozesskommunikation (mittels Semaphoren, Shared Memory und Nachrichten), Signale, Pipes, Systemfunktionen (Fileverwaltung, Systemadministration).

Fragen zur LVA werden im
Forum behandelt.
Homepage: Systemnahes Programmieren
Anmeldung: TI - MyTI Login
Unterlagen: Folien
VO Wiki: Systemnahes Programmieren VO
VO Wiki: Systemnames Programmieren LU
Informatik Forum: SysProg LU

  • EDV Vertragsrecht

Ziel der Lehrveranstaltung
Verständnis für die wesentlichen speziellen Fragen von EDV-Verträgen, insbesondere einseitig benachteiligender Vertragslage.

Inhalt der Lehrveranstaltung
Einführung in spezielle Probleme von Kaufverträgen und Mietverträgen über Hardware, sowie von Softwareverträgen - Probleme der Rechtsstellung von Software - Behandlung des Stoffes im Zusammenhang mit konkreten Beispielen aus Hersteller-Standardverträgen.

TO BE CONTINUED...

Sunday, September 24, 2006

Time-Table WS 2006/2007 | Final Design

Although I call this post 'Final Design' there still can be changes ;o) First I'd like to show you a monthly overview and then a detailed view (first week) of my time table for the next semester at university.


Monthly Overview


Detailed Overview of the first semester-week

Summarisation of each subject will follow soon!

cheers